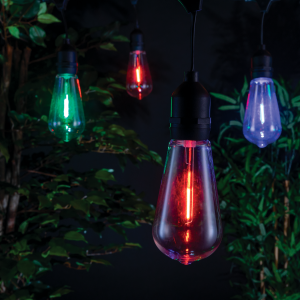
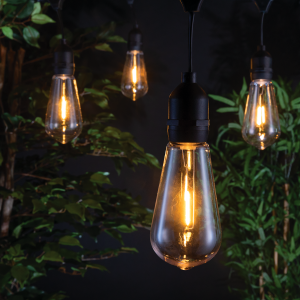
There’s something effortlessly charming about festoon lights. With their warm, nostalgic glow, they can instantly transform any outdoor space into a magical setting—be it for a summer barbecue, a cosy garden retreat, or a stylish event. But getting them hung properly, safely, and attractively takes a little planning. In this guide, we’ll walk you through everything you need to know to hang festoon lights with confidence and flair.
Before we dive into the “how”, let’s talk about the “why”. Their soft glow creates a welcoming atmosphere, ideal for:
They’re weatherproof, reusable, and energy-efficient (especially with LED options). Plus, they can be used year-round—not just for Christmas!
Hanging festoon lights doesn’t require fancy equipment. Here’s a basic checklist:
Before you get the drill out or unbox your lights, take a few moments to plan your setup. A well-thought-out layout will not only save you time and hassle during installation but also ensure your lights look balanced, safe, and professionally hung.
Start by deciding where you want your lights to begin and end. This could be across a patio, between trees, along a garden fence, or over a dining table. Use a measuring tape to calculate the total length needed, including any dips or swoops in the design.
A common mistake is forgetting to account for slack when you install festoon lights. If you’re going for a draped or scalloped look, allow an extra 10–15% in length to achieve the right amount of curve without tugging the lights taut. It’s always better to have a little extra cable than fall short mid-hang.
Locate your nearest outdoor power socket. If you’re using plug-in festoon lights, make sure the cable can reach the socket, or use a weatherproof extension lead rated for outdoor use. Protect connections with an outdoor junction box or use a drip loop—a small downward loop in the cord—to prevent rainwater from running down into plugs.
No nearby power? No problem. Battery-powered or solar festoon lights are ideal for remote corners of the garden, and many modern options still deliver a strong, warm glow with excellent battery life.
There’s more than one way to style festoon lights, so think creatively! Do you want:
Use chalk, masking tape, or small markers to visualise the pattern before committing. If you’re decorating for an event, consider sketching your plan on paper and factoring in where furniture or décor will go. Social media platforms like Instagram and Pinterest are goldmines for visual inspiration.
Depending on your space and surface types, there are several ways to hang festoon lights. Here are the most common methods, with practical advice for each.
This is one of the most secure and long-lasting methods, especially for patios or courtyards.
Step-by-step:
Pro tip: Guide wire kits are inexpensive and essential for permanent or semi-permanent setups.
Trees are great natural anchors—but they require care.
Step-by-step:
Safety note: Never screw directly into a tree unless it’s deadwood or you’re working with a professional arborist.
Perfect for linear runs along the perimeter of your space.
Step-by-step:
This approach works well for back gardens, decks, and outdoor seating areas where you want the lights to trace a border.
For wide-open spaces like lawns or large patios without nearby anchor points, this is your best bet.
Step-by-step:
Optional: Use decorative planters filled with gravel or concrete bases for a movable lighting option.
Once your festoon lights are in place, take a step back and wait for dusk to fall—this is the best time to see how your setup truly performs. Switch the lights on and walk around the space to inspect from different angles. Look out for:
If you’ve used a draped design, make sure each curve hangs gracefully and at a similar height to the next. This small detail can dramatically improve the overall symmetry and elegance of your display.
To enhance the atmosphere further, think about layering your lighting. For example:
Don’t forget comfort and practicality. If your lights are part of an outdoor dining or seating area, check that they’re not shining directly into people’s eyes—angle bulbs away or use softer wattages where needed.
A well-finished setup should not only look beautiful but also feel effortless, inviting, and safe. Take pride in the details—they’re what turn a nice lighting job into an unforgettable one.
Festoon lights are one of the easiest ways to elevate your outdoor space and create an inviting atmosphere all year round. Whether you’re lighting up a party or simply enjoying a quiet evening outdoors, the right setup makes all the difference. With a clear plan, the right materials, and a few practical tips, you’ll have a lighting display that’s both functional and stunning. Now all that’s left to do is sit back, relax, and enjoy the glow.